Wednesday, April 29, 2009

Chocolate Hazelnut Biscotti

Chocolate Hazelnut Biscotti
From Chocolate for Breakfast

Hands time: 15 minutes
Baking time: 30 minutes plus another 20 minutes after cooling
Cooling time: at least 30 minutes – must be really cool before slicing for second baking

Makes 5-6 dozen

Ingredients:

1 cup sugar
½ cup melted butter (1 stick)
3 large eggs
¼ tsp salt
1 tbsp vanilla
1 cup chocolate nibs (see photo after “ingredients”) or chopped, skinned roasted hazelnuts
2 cups chocolate chips
2 cups plus 2 tbsp flour (I used all purpose)
1 tbsp baking powder
1/3 cup cocoa powder
½ tsp freshly grated nutmeg
½ tsp ground cinnamon
¼ tsp freshly ground black pepper – yes you read right!


Chocolate Nibs

Directions:

1. Preheat the oven to 350°F/170°C and line a rimmed baking sheet with parchment paper.

2. Beat the sugar and butter in a mixing bowl until creamy. Add the eggs, salt and vanilla and continue mixing until light and fluffy. Stir in the chocolate chips and nibs (or hazelnuts).

3. Put a sieve/strainer over a bowl and sift the remaining ingredients through it. Add to the wet mixture and using a wooden spoon or spatula to fold together. This is a moist and pliable dough, but it takes a while to get there.

4. Divide the batter in half and form into 2 logs on the cookie sheet, each 15” long, 2-3” wide and 1” thick.

5. Bake for 30 minutes (the logs will feel firm to the touch). Put the cookie sheet on a rack to cool and let them come to room temperature before slicing them. If you cut them while they are warm, they will crumble.
6. Slice the logs across or diagonally no more than ½” thick. Place them on the same cookie sheet , end pieces cut side down…the rest doesn’t matter. If the cookies are cut too thick they will be tough rather than crispy.

7. Bake for another 20-25 minutes until they are crisp and dry. Let them cool completely on the sheet before moving them to an air tight container…or with that first cup of tea or coffee.

Romesco Sauce

Romesco Sauce
From Chocolate for Breakfast

Hands time: 15 minutes
Roasting time: 15 minutes

Makes 5 cups

Ingredients:

1 cup blanched almonds
3 slices sourdough bread (1” thick)
6 garlic cloves, unpeeled
2 red bell peppers, stemmed, seeded and roughly chopped
6 tomatoes, quartered
2 large cloves garlic, peeled
3 tbsp paprika (I used 1 heaping tbsp hot and 2 sweet paprika)
1 tsp salt
1 tsp freshly ground pepper
1 tbsp red pepper flakes (I opted out since I used hot paprika, but …go with your flavor buds)
2 cups good olive oil
1 cup red wine vinegar

Directions: Note…you will need a large food processor for this or else do step 2 in the food processor and transfer to a large bowl and finish with an immersion blender. Another option is to do 2 batches in the food processor. Split the finely chopped nuts and bread in half before proceeding.

1. Preheat the oven to 400°F/200°C and line a rimmed baking sheet with foil. Roast the slices of bread, unpeeled garlic and almonds for about 15 minutes or until you smell the nuts roasting.

2. Cool slightly and break the bread up. Place in a food processor along with the nuts and roasted garlic. Puree until finely ground (3-5 minutes).

3. Best if you can do it all in the food processor, but see note above for your other options. Add red peppers, tomatoes, peeled garlic, paprika, salt, pepper and red pepper flakes, if you’re using them. You might want to wait until you’ve tasted it first. Process until smooth.

4. With the motor running, pour the olive oil through the feeding tube and then the vinegar, processing until the sauce is thick, smooth and emulsified

Barbara Passino recommends this sauce served with grilled meats, cheeses, vegetables and breads. She forgot to mention it as a pasta sauce….It’s delicious whichever way you choose.

Sunday, April 26, 2009

Lacy SIngapore Omelets

Lacy Singapore Omelet
From Chocolate for Breakfast

Prep time: 5 minutes
Cooking time: 10 minutes (mostly for the filling)
Serves 2

Ingredients:
4 large eggs, beaten
1 tbsp olive oil
Filling:
1 tbsp oil (I used olive oil)
¼ cup onion, finely chopped
2 scallions/green onions, cut into ½” pieces
1 cup shitake mushrooms, stems removed, sliced (I actually used cremini as I ran out of shitake) ¼ cup sweet red bell pepper, diced
¾ tbsp fresh ginger root, finely grated
½ Serrano chili, finely minced ( I only had a jalapeno pepper on hand)
Juice of ½ lime
½ tbsp soy sauce
½ tbsp hot chili oil (being delicate, and frankly the jalapeno was enough spice for us, I used toasted sesame oil instead to keep it “Asian”)

Directions

Filling: so pretty all by itself
1. Heat 1 tablespoon oil in 10-inch nonstick skillet over medium-high heat. Add onions and sauté until translucent (2-3 minutes, after all they are finely chopped). Turn up the heat and add the rest of the ingredients, stirring until the mushrooms turn soft and moist. Remove from heat while you prepare the omelets, which only take a minute or two, so have toast and table ready.

Omelet:

1. Add remaining 1 tablespoon oil to large skillet; heat over medium-high heat.

2. Place a sieve/strainer over a bowl set close to the stove. Pour beaten eggs into the sieve now positioned over the hot skillet and quickly drizzle the eggs in a rough circle. (The author used small skillets, one per omelet and half the beaten egg for each. I used a large skillet and the entire beaten egg mixture, then cut the finished omelet in half for my Honey and me to share). It will look lacy and have holes, but should hold together. The entire cooking process takes only a minute or so.

3. Remove from the skillet and transfer to plate(s). If you are making small omelets you would only use about half the egg mixture for each omelet. The edges will look dry.

4. Using spatula to help, Slide from pan to plate, place ½ the filling on one side of the omelet and fold other side over top and serve.

Friday, April 24, 2009

Buttermilk Scones with Dried Currants

Buttermilk Scones with Dried Currants
Adapted from Once Upon a Tart

Prep time: 10 minutes
Baking time:25-30 minutes

Makes 10 scones

Ingredients:
4 cups unbleached all purpose flour
1 tbsp baking powder
1 tsp baking soda
½ tsp salt
2/3 cup sugar
2 ½ sticks (20 tbsp) cold, unsalted butter, cut into ¼” pieces
2 large eggs
1 cup cold buttermilk
1 tablespoon vanilla extract
1 cup dried currants

Directions:
1. Preheat oven to 400°F/ 200°C. Line a baking sheet with parchment paper.

2. Put the dry ingredients in the bowl of the food processor fitted with the metal blade. Pulse a few of times to combine.

3. Add the chilled butter all at once and run the processor for 15 seconds or so. Switch to pulse and continue pulsing until there are no chunks of butter and the mixture looks like moist crumbs. Be careful not to over mix. Transfer to a large bowl.

4. In a small bowl, whisk the eggs and then add the buttermilk and vanilla. Whisk a little more to blend and then add the currants.

5. Pour the wet ingredients into the dry and use a wooden spoon to mix it all together. It starts out dry but as the authors say…"don’t give up or add more liquid". It takes a little elbow grease, but it will form a dough. All the flour should be incorporated but it will still come together. They also say to stop as soon as the flour is no longer visible….too much working of the dough is not a good thing.

6. Use a ½ cup measure or your hands to scoop the batter and “plop” it onto the baking sheet (I did pat them together a bit first), leaving 2” between scones.

7. Bake in the center of your oven until the tops are golden brown and a toothpick comes out clean.

8. Remove from the oven and cool on a wire rack for a few minutes.

Alsatian Apple Tart

Alsastian Apple Tart
Adapted from Once Upon a Tart

Crust can be prepared a day ahead….
Prep time: 60 minutes
Baking time:75 minutes

Servings: 4-6 - makes enough dough for 2 9" pie crusts

Ingredients:
Crust: DO NOT PREBAKE

Flaky Tart Crust modified slightly – this recipe makes enough for 2 – 9” tarts:
2 ¼ cups all purpose flour (the book calls for 2 ½ cups, but it kept crumbling for me)
1 tsp sugar
1 tsp salt
12 tbsp (1 ½ sticks) cold unsalted butter, cut into ¼” pieces
5 tbsp cold solid vegetable shortening (I used Crisco)
Ice cold water (they suggest starting with 4 tbsp and then adding by the tbsp as needed. I ended up using a little more than half cup – double what they said

Filling:
2-4 large tart apples, peeled & cut in half top to bottom, remove the core and stem (they recommend Granny Smith, I had Honey Crisp on hand and they worked fine too) – it really does depend on your tart pan. Mine was 8” not nine. Make several layers, almost to the top of the crust.
2 large eggs
1/3 cup sugar
½ cup light cream
½ cup milk
1 tsp vanilla extract
¼ cup Apricot glaze (I used my favorite Tangled Garden Apple Sage Jelly, warmed and thinned with a touch of water)

Directions:
Crust

1. Put the flour, sugar and salt in the bowl of the food processor fitted with the metal blade. Pulse a couple of times to combine.

2. Add the chilled butter and shortening and pulse - until the mixture looks like “moist crumbs” (I’m not sure what that looks like exactly, but don’t allow it to come to a paste) .

3. This step is where I had difficulty. I usually over mix and make a tough dough, so this time – twice in fact, I didn’t add enough water and it was too crumbly to roll. I took some liberties a la Barefoot Contessa, Instead of turning the flour/butter mixture into a large bowl and adding tablespoons of water and mixing by hand….I added ½ cup of water through the feeding tube and pulsed until it started to form a ball. I then gathered it into a ball (actually split the dough into two portions).

4. Wrap each ball, flattened to a disk, in plastic wrap and refrigerate for 30 minutes or longer.

5. Roll the dough on a lightly floured surface, about 2” larger than the circumference of the 9” tart pan (with a removable bottom). Fold over the rolling pin and place in the tart pan, gently fitting the pastry up the sides, flush with the bottom. Remove any excess pastry from the top.

6. Refrigerate for another 30 minutes before baking in the center of the oven. All this refrigerating , makes sure the butter is cold so that when it hits the heat of the oven, it will make the flakiest crusts imaginable.

7. Preheat oven to 350°F/ 175°C.

8. While the crust is in the fridge for the final chilling, thinly slice (1/8” thick) the apples top to bottom. I used my mandoline, but a sharp knife does the trick too.

9. Lay the apples over the unbaked crust, overlapping from the outer edge around and then spiraled (also overlapping) to the center. Keep layering until the apples almost reach the top of the crust.

10. In a medium bowl or large measuring cup, whisk the eggs. Add the sugar and whisk until light and creamy yellow in color. Add the cream, milk, and vanilla extract. Whisk and pour over the apples…this is your "custard". Only use as much as your pan will allow and …for easy cleanup, bake your tart on a rimmed baking sheet. Bake for 1 hour and 15 minutes or until the custard (egg mixture) won’t jiggle in the middle when you shake the pan. The apple slices will look dry and pale…have no fear, that’s what the glaze is for!

11. Remove the tart from the oven and set on a wire rack to cool slightly. The easiest way to remove the tart…great tip from the authors…is to place the entire pan on a large can, well balanced, and allow the outside ring to fall. Place the tart on a work surface and slide off the metal onto a serving plate.

12. Warm the glaze or (jelly in my case) over low heat to melt which makes for easy brushing over the warm tart. Note: please remember to remove the tart from the outer ring of the pan before doing this. I didn’t and some of the flaky crust stuck to the rim. It still tasted awesome, but presentation was a little flawed.

Serve warm or at room temperature. I personally favor warm and a little vanilla ice cream melting on the side is delicious too.

Thursday, April 23, 2009

Beef Shank & Sausage Ragu with Bucatini

Beef Shank & Sausage Ragu over Bucatini
Adapted from Bon Appetit

Hands on time: 30 minutes plus 20 minutes after roasting
Roasting time: 2 ½ hours
Tastes even better the next day and freezes well

Serves 12

Ingredients:
Ragu:

2 tsp fennel seeds
3 tbsp olive oil, divided
2 lb/900g sweet fennel sausages, casings removed (or hot Italian sausage if you prefer it very spicy)
3-3 ½ lb/1.3 -1.5kg beef shanks with bones cut into 1½” thick slices across the bone. – 3-4 pieces
3 large onions, chopped
2 cans (28oz/796ml) tomatoes in juice (just squish the tomatoes as you pour into the pot)
½ bottle robust red wine (the recipe actually called for a whole bottle -25oz/750ml but I couldn’t fit it all into my large Dutch oven. I used a lovely Italian Merlot)
8 large cloves garlic, chopped
4 bay leaves
2 tsp dried oregano
1-2 tsp dried red chili pepper flakes

Pasta:
1 box bucatini (500g/ 8oz) or whole grain spaghetti like the magazine suggests
3 tbsp extra virgin olive oil
¾ cup freshly grated Parmesan cheese (I like mine coarsely grated for this dish)
1/3 cup fresh Italian/flat leaf parsley, finely chopped

Directions:
Ragu:
1. Preheat the oven to 350°F/175°C and prepare a large rimmed baking sheet by covering it with tin foil for easy clean up. The covered pot will bubble over.

2. Toast fennel seeds in a small dry skillet over medium low heat until slightly darker in color and very fragrant…about 3 minutes. Set aside.

3. Heat 2 tbsp oil in a large Dutch oven or other oven-proof pot over medium-high heat. Add the sausage meat and cook until brown with no pink in the center, stirring occasionally and breaking up the meat with a fork or back of a wooden spoon. Using a slotted spoon, transfer the sausage meat to a large bowl.

4. Drain any liquid, and add another 1-2 tbsp oil. Sear the beef shanks which have been seasoned with a little pepper (about 5 minutes or so per side. They’re ready to flip when they no longer stick to the pan). Transfer seared shanks to the sausage meat.

5. Reduce heat to medium. Add onions to the pot and sauté until browned, scraping up the bits on the bottom. You might need a little more oil as well. (about 10 minutes)

6. Bon Appetit suggests returning beef shanks, sausage meat and any liquid back to the pot at this point, but I found my pot, large as it is, made it difficult to incorporate all the other ingredients. So….I added, tomatoes with juice, (I just squished the tomatoes through my fingers to mush them up a bit), garlic, bay leaves, oregano, crushed red pepper and toasted fennel. Mix to combine well. Add the meat, toss to coat and add as much wine as your pot will hold. Leave about 1”. Bring to a simmer.

7. Cover and place in the oven. Braise until very tender (at least 2 ½ hours). Transfer the beef shanks to a work surface and shred meat off the bones. Discard bones. Mine had lots of marrow, so I took a trip down memory lane and spread the warm marrow over fresh bread…delicious! Skim off any fat from the sauce and return shredded meat to the pot and simmer on top of the stove over medium heat until the liquid is reduced enough to coat the back of the spoon. (about 10 minutes). Taste for seasoning.

Can be made several days ahead. Warm over medium heat, stirring occasionally.

Pasta:
1. Cook the pasta in a large pot of salted water until al dente.

2. Drain and transfer to a large serving bowl. Add olive oil and toss to coat. Add the cheese and parsley and toss again.

3. Divide into individual serving bowls and ladle the ragu over it and serve.

Wednesday, April 22, 2009

Roasted Potato Tart with Mushrooms & Gruyere

Roasted Potato Tart with Sauteed Mushrooms & Gruyere
Adapted from Once Upon a Tart


Seriously, how delicious does that look, and so flaky
Can be made in two stages.
Crust can be made a day ahead….total time 90 minutes
Final roasting and baking …90 minutes

Servings: 4 dough makes enough for 2 9" crusts

Ingredients:
Crust:

Crunchy Savory Tart Crust modified slightly – this recipe makes enough for 2 – 9” tarts:
2 cups all purpose flour (the book calls for 2 ½ cups, but it kept crumbling for me)
3 tbsp semolina flour
1 tsp salt
12 tbsp (1 ½ sticks) cold unsalted butter, cut into ¼” pieces
3 tbsp cold solid vegetable shortening (I used Crisco)
Ice cold water (they suggest starting with 4 tbsp and then adding by the tbsp as needed. I ended up using a little more than half cup – double what they said

Filling:
1 lb/450g red skinned potatoes, scrubbed and cut into ½” disks
1 medium yellow onion, diced
¼ cup olive oil
2 large cloves garlic, peeled and minced

2 tsp fresh tarragon, chopped (I’m not a tarragon fan, so I used rosemary. Thyme would be awesome too)
4 large eggs
1/2 cup light cream
Salt & pepper
1 -1½ lb/450-700g mushrooms, thinly sliced (I used shitake & cremini)
½ heaping cup Gruyere cheese, coarsely grated

Directions:
Crust

1. Put the flours and salt in the bowl of the food processor fitted with the metal blade. Pulse a couple of times to combine the flours and salt.

2. Add the chilled butter and shortening and pulse - until the mixture looks like “moist crumbs” (I’m not sure what that looks like exactly, but don’t allow it to come to a paste) .

3. This step is where I had difficulty. I usually over mix and make a tough dough, so this time – twice in fact, I didn’t add enough water and it was too crumbly to roll. I took some liberties a la Barefoot Contessa, Instead of turning the flour/butter mixture into a large bowl and adding tablespoons of water and mixing by hand….I added ½ cup of water through the feeding tube and pulsed until it started to form a ball. I then gathered it into a ball (actually split the dough into two portions.

4. Wrap each ball, flattened to a disk, in plastic wrap and refrigerate for 30 minutes or longer.

5. Roll the dough on a lightly floured surface, about 2” larger than the circumference of the 9” tart pan (with a removable bottom). Fold over the rolling pin and place in the tart pan, gently fitting the pastry up the sides, flush with the bottom. Remove any excess pastry from the top.

6. Refrigerate for another 30 minutes before baking in the center of the oven. Preheat oven to 400°F/ 200°C . All this refrigerating , makes sure the butter is cold so that when it hits the heat of the oven, it will make the flakiest crusts imaginable.

7. Use a fork to prick holes over the bottom of the pie shell. Place a sheet of parchment paper (larger than the tart pan) over the pie crust and cover with pie weights (I used dried beans – just save them for the next pie and remember not to use them for cooking) and bake for 10 minutes. Remove the weights and return the tart to the oven and bake for another 5-10 minutes or until the crust is golden brown.

8. Remove from the oven and allow to cool.

Filling & Final Baking:
1. Preheat oven to 450°F/ 220°C

2. In a large bowl, toss the potatoes with half the olive oil, onions, garlic, salt & pepper. Lay in a single layer on a rimmed baking sheet, lined with parchment and roast for until golden and fork tender (about 15 minutes, turning midway). Remove from the oven and allow to cool slightly before filling the pie shell.

3. Reduce the oven temperature to 375°F/ 190°C . Sprinkle the tart shell with chopped herbs and place the potato slices and onions evenly over the crust.

4. In a medium bowl or large measuring cup, whisk the eggs. Add the cream and pepper and pour over the potatoes…this is your "custard". Only use as much as your pan will allow and …for easy cleanup, bake your tart on a rimmed baking sheet.. There should be some crust exposed. Bake for 55-60 minutes or until the custard (egg mixture) won’t jiggle and is firm.

5. In the meantime, Heat the rest of the olive oil in a non-stick skillet over medium high heat. Add the mushrooms and sauté until golden…about 5 minutes.. Remove from heat.
6. Top the tart evenly with the grated cheese and then add the mushroom mixture to cover the cheese. Return to the oven for 5-10 minutes (until the cheese melts).

7. Remove the tart from the oven and allow to cool on a wire rack for about 5 minutes before removing the outer part of the pan. The easiest way to remove the tart…great tip from the authors…is to place the entire pan on a large can and allow the outside ring to fall. Place the tart on a work surface and slide off the metal onto a serving plate.

This dish can be served warm or at room temperature. The simplest salad makes a complete meal. ( Toss some arugula with a drizzle of good quality olive oil and some balsamic apple cider vinegar). Also great as part of a buffet brunch or picnic supper.

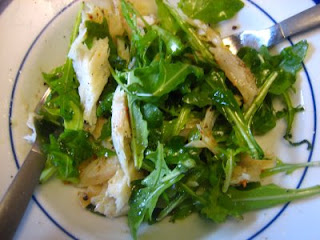
Smoked Fish & Arugula Salad for Earth Day

Smoked Fish & Baby Arugula Salad

Prep Time: 5 minutes

Serves 4

Ingredients:
1 cup baby arugula/person
Drizzle of good quality extra virgin olive oil
Drizzle of Balsamic Apple Cider vinegar
A little salt and pepper
½ -1 smoked fish fillet (depending on the size)/person I love the fresh hot smoked spiced halibut fillets from Scotian Halibut Limited (locally farmed and smoked)

Directions:
1. Place arugula in a serving bowl. Drizzle with oil and vinegar, season with salt & pepper, toss and taste for seasoning.

2. Break up the smoked fish fillet and toss with the salad..

Serve…how hard is that!

Monday, April 20, 2009

Frozen Fruit Crisp

Frozen Fruit Crisp
Inspired by Chef Michael Smith

Serves 4
Prep time: 5 minutes
Baking time: 45-60 minutes

Ingredients:
Filling:
4 cups frozen fruit (they have so many delicious mixes these days, so whatever you prefer. The photo is a combo of Caribbean Fruit mix and some wild blueberries)
¼ cup all purpose flour
¼ cup sugar
2 tbsp lemon juice
Topping:
¾ cup brown sugar, packed
¾ cup all purpose flour
½ cup butter, chilled (and I used Chef Michael’s trick of grating using the coarse grater side of my box grater – super easy, super easy clean up too!)

Directions:
1. Preheat the oven to 375°F/180°C

2. Toss everything for the filling together in a mixing bowl, scoop into an oven-proof dish. (The secret is to fill the dish just to the brim, so choose your dish appropriately) and then place on a rimmed baking sheet lined with aluminum foil (easy cleanup).

3. In a separate bowl combine the topping ingredients and blend with a fork. Pour over the filling, spreading so that no fruit is exposed.

4. Roast for 45 minutes, or until the top is golden and there is some bubbling below.

Now there’s never an excuse for no dessert.

Grate some chocolate over the top and it’s even FANCY!!!

Wednesday, April 15, 2009

Cheese Blintzes

Cheese Blintzes
From Every Kitchen Tells Its Stories

Hands-on time: 30 minutes
Cooking time: 60 minutes
Makes 1 dozen blintzes

Ingredients:
Crepe/Blintz:
3 eggs
1 cup cold water
½ tsp salt
2 tbsp vegetable oil
1 cup flour
Filling:
1½ lbs/680 g dry cottage cheese
3 eggs
1½ tbsp melted butter
1-2 tbsp sugar
lemon juice to taste (½ lemon to start)
Zest of 1 lemon
1 tsp vanilla (I only use this when I’m making dessert blintzes)

Directions:
1. Preheat oven to 350°F/ 180°C

2. Combine eggs, water, salt and oil in blender until well mixed. Then add flour in 2 batches. Mix until there are no lumps. Gently stir to remove air bubbles and let sit for at least 30 minutes before frying (this eliminates holes in the crepes).

Tip: When I have the time (or remember), I actually let it sit overnight in the fridge. It’s amazing what a difference it makes. You’ll rarely have to waste the first couple of crepes because they have too many holes.

3. Pour batter (about ¼ cup) into a hot, lightly greased 8” non-stick frying pan. Rotate the pan quickly so that mixture covers the bottom completely and evenly. Fry on one side only. The crepe is ready when it appears dry on the top. The underside will be golden in parts.

4. Turn out the crepe, gently prying the edges, onto waxed or parchment paper, with browned side up. You can overlap the crepes slightly, but don’t completely overlap them while they are hot as they will stick together.

Filling:
1. In a large bowl, mix all the filling ingredients together and place 1 heaping soup spoonful (about ¼ -⅓ cup) of filling in center of crepe.

2. Make an envelope (bottom of crepe over filling, then one side, other side and lastly the top).

3. Fry briefly in butter on both sides and then bake seam side down for 15 minutes at 300°F/150°C to heat through without burning the crepes.

Tip: Sometimes, if I make a small batch I just stick the skillet in the oven, so make sure yours is oven proof. Usually I use a lightly greased Pyrex baking dish that will hold all the blintzes with a little room between each of them…the blintzes will swell a little in the oven (see photo) and then deflate when you serve them.

Serve with sour cream.

Sunday, April 12, 2009

Farfel Stuffed Chicken Breasts with Blackcurrant Sauce

Farfel Stuffed Boneless Chicken Breasts with Black Currant Sauce
Adapted from Joan Nathan’s Jewish Cooking in America and served here with Wild Mushroom Potato Kugel and roasted asparagus spears this time just tossed with some oil, salt & pepper.

Hands-on time: 20 minutes
Baking time: 1 hour
Serves 8-10

Ingredients:
Stuffing:

1 cup boiling water (or ½ cup water, ½ cup chicken broth)
3 cups matzo farfel (or matzo crumbled into medium sized bits)
1 medium onion, chopped
2 cups cremini mushrooms, coarsely chopped
3 large cloves garlic, chopped
1 tbsp oil
Salt & pepper to taste
3 large eggs, beaten
1 tsp dried thyme

1 boneless chicken breast half per person (plus I always add 2 just in case)

Sauce:
¼ cup Manischewitz or other sweet red wine or Port
1 jar (12oz/340g) blackcurrant preserve – apricot jam, or whatever jam you favor

Directions:
Preheat the oven to 350°F/170°C

Stuffing:
1. Pour boiling water (or water/broth mix) over the farfel in a large bowl. Let sit for 5 minutes or until the water is all absorbed. Allow to cool for a few minutes.

2. Meanwhile, sauté onions, mushrooms, thyme and garlic in some oil over medium heat until the onions and mushrooms are soft and starting to brown. Remove from heat, allow to cool and add to the farfel, toss together.

3. Add the beaten eggs, salt & pepper and mix well.

Preparing the chicken breasts:
1. Oil a large oven proof dish just large enough to hold all the chicken rolls with a bit of space between them.

2. Butterfly the chicken breasts (tutorial at end of post) and flatten evenly.

3. On a cutting board, or other flat surface, place the prepared breasts shiny side (where the skin used to be) down. Spoon some filling (about the size of a lime) in the center of the breast. Roll the chicken over the filling, starting at the bottom and then place the roll, seam side down in the baking dish. No need to use tooth picks or string to secure them.

4. Once all the breasts are in the dish, drizzle with a little wine and spread a large spoonful of jam over each breast, trying to cover the top. Bake, uncovered for 30 minutes or so and then add the rest of the jam to the juices and shake to incorporate the jam into a “sauce”. Continue to bake for another 15-20 minutes, or until the chicken is no longer pink in the center, spooning sauce over the chicken occasionally.

5. Place the chicken rolls on a platter and place the baking dish on top of the stove over medium high heat to thicken the sauce. Serve separately or pour over the chicken on the platter.

How to Butterfly boneless chicken breasts:

1. Place chicken breast skin side up on the cutting board. If the piece has no skin on it, place the shinier, smoother side up. Start at the edge of the breast that is slightly split (the filet).

2. Work toward the opposite edge but don’t go right to it, making a cut through the thickest part of the breast, creating a much larger, thinner piece of chicken.

3. The idea is to end up with a piece of chicken of almost even thickness and about twice the original size.

4. Flatten with a wooden mallet or heavy bottomed pan until the breast is the same thickness all over.

Sweet Potato & Mushroom Lasagna - Passover Friendly


Norene's Sweet Potato & Mushroom Lasagna

Perfect for Passover…no noodles!
From Norene's Healthy Kitchen


Hands-on time: 20-30 minutes
Baking time: 1 hour or until cheese is melted and golden
Resting time: 10-15 minutes
Serves 10-12

Ingredients:
Sauce
:
2 medium onions, peeled and quartered
3 cups mushrooms ( I always choose cremini), cut in half or quartered if large
1 red pepper, seeded and cut into large chunks
1-2 tbsp olive oil
3-4 large cloves garlic, minced
½ cup fresh Italian/flat leaf parsley, chopped
2 tbsp fresh basil leaves, chopped or 1 tsp dried
3 cups Italian style tomato sauce
Salt & pepper to taste
1 tsp sugar (my addition to counter the acidity of the tomatoes)

3 large sweet potatoes

Filling:
3 cups light ricotta cheese
1 cup grated Parmesan cheese
1 large egg
Salt & pepper to taste
1 tsp dried basil
1 tsp dried oregano
2 cups grated mozzarella cheese

Directions:
Sauce
:
1. Process the onions, mushrooms and red peppers in a food processor using quick on/off pulses until they are coarsely chopped.

2. Heat some oil in a large pot or Dutch oven over medium high heat and sauté the vegetables until golden (about 10 minutes).

3. Add the garlic, parsley, and basil along with the tomato sauce, salt & pepper. Lower the heat and simmer uncovered, stirring occasionally for 10-15 minutes. Taste for seasoning (this is usually when I add some sugar). Norene’s note: the sauce can be made a day ahead and refrigerated.

Lasagna:

1. Preheat the oven to 350°F/170°C line a rimmed baking sheet large enough to hold a 13”x9” baking dish with foil for easy cleanup.

2. Two versions for prepping the sweet potato:
Norene’s version: pierce sweet potatoes with a sharp knife and microwave on high for 6-8 minutes until partially cooked. Cool slightly before peeling. Cut into thin slices with a sharp knife. You should have about 6 cups. Transfer to a bowl and sprinkle with additional salt & pepper.
Ruth’s version: next time I’ll just peel raw sweet potatoes and thinly slice with a Mandoline. Toss with a little olive oil, salt and pepper.

3. In a large bowl, mix the ricotta, Parmesan and filling seasonings.

4. Grease an oven proof 13”x9” baking dish with a little olive oil. Do the layering as follows:
• 1/3 of the sauce spread evenly over the bottom of the dish
• Arrange 1/3 of the sweet potatoes to cover the sauce completely (this is the “noodle” layer)
• Evenly spread half the ricotta mixture (Ruth’s note: Joanna & I forgot to add 2/3 cup mozzarella separately at this point and perhaps that’s why it was soupy to serve)
• 1/3 sauce
• 1/3 sweet potatoes
• Rest of the ricotta mixture
• Last of the sweet potatoes
• Last of the sauce
• Mozzarella cheese to cover.
Norene says this can be prepared up to this point a day in advance as well. Just let it come to room temperature before baking.

5. Bake for 1 hour or so. Norene covers hers with foil for the first 45 minutes, we left it uncovered for the entire time. The sweet potatoes should be tender when you insert the tip of a sharp knife.

6. Remove from the oven and let it rest for 10-15 minutes before serving for easier slicing. We needed a spoon to serve because we rushed the process, so it was a bit soupy, but very delicious.

Passover Rolls

Passover Rolls
Adapted from Second Helpings, Please with a twist from my mother-in-law

Prep time: 5 minutes
Rest time: 15 minutes
Baking time: 50-60 minutes

Makes 10-12

Ingredients:
2 cups matzo meal
1 tsp salt
1 tsp sugar
1 cup water
½ cup vegetable oil
4 large eggs

Directions:
1. Combine matzo meal, salt & sugar in a large bowl.

2. Bring the water and oil to a boil in a small pot. Pour into the matzo meal and stir until the water is absorbed. Beat in the eggs, one at a time. Let the mixture sit for 15 minutes.

3. Preheat the oven to 400°F/200°C. Line a large cookie sheet with parchment paper for easy cleanup.

4. My mother-in-law’s tip: Divide the mixture into 10 or 12 equal portions before forming the batter (very thick) into balls.

Norene’s advice: oil your hands to keep the dough from sticking.

Ruth’s note: do this for each ball.

Mother-in-law’s way: Pat each ball to flatten somewhat (about ½”) and make a hole in the center – sort of like a bagel.

5. Bake for 50-60 minutes or until golden brown.

Saturday, April 11, 2009

Wild Mushroom Potato Kugel

Wild Mushroom Potato Kugel
From The Gefilte Variations

Hands on time: 20-30 minutes
Baking time: 1 hour
Rest time: 10 minutes

Serves 8-10

Ingredients:
1oz/28g dried wild mushrooms
4 tbsp olive oil plus enough to grease the pan
12oz/340g onions, thinly sliced (about 3 cups)
Salt & freshly ground black pepper
2 tsp garlic, chopped
6-8 medium russet (baking potatoes) peeled
4 large eggs, beaten
Excellent quality extra virgin olive oil to drizzle over the kugel
Sweet Hungarian paprika to sprinkle over kugel

Directions:
1. Soak the dried mushrooms in 2 cups of very hot water for 1 hour or until soft. Drain the mushrooms through a sieve and reserve the soaking liquid. Drain the soaking liquid through a strainer lined with paper towels or coffee filter paper. Rinse the mushrooms under cool water, squeeze dry and coarsely chop.

2. Heat oil in a heavy skillet over medium heat. Add the onions and sauté until crisp and golden (about 15 minutes….don’t rush this step…the caramelizing of the onions makes them sweet). Transfer to a bowl and season with salt and pepper.

3. In the same pan (no need to wash) add the chopped mushrooms, garlic and reserved soaking liquid. Boil over high heat, stirring occasionally until all the liquid evaporates and remove from heat.

4. Preheat the oven to 350°F/180°C. Grease a 13” x 9” large oven proof lasagna dish, (the book recommends enameled cast iron or metal not glass) with olive oil and place in the oven. This makes for a crispy crust when you finally add the potato mixture.

5. Grate potatoes in a food processor or large holes of a hand grater (I always take the easy way). Transfer to large bowl of cold water through this process to keep the potatoes from turning grey. Change the water once and then drain the potatoes. Squeeze out as much water as possible. Dry the bowl and then return the potatoes adding the eggs, fried onions and more salt & pepper.

6. Remove the hot pan from the oven and pour out any extra oil into the potato mixture. Pour half the potatoes into the pan, spread the mushroom mixture evenly over top and then cover with the rest of the potatoes, adding any of the liquid.

7. Drizzle with a little good quality olive oil and sprinkle with some sweet paprika.

8. Bake for about 1 hour or so until golden Remove from the oven and let it stand for 10-15 minutes.