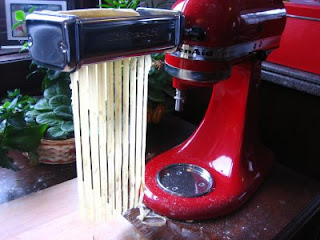
thanks to my KitchenAid Artisan Stand Mixer
Time: 45 minutes (just because it was my first time… I’m sure next time will just be about 30 minutes from flour to pasta!
Serves 4
Ingredients:
I actually made this batch from a mix that came with my KitchenAid Pasta Kit, but the manual suggests the following:
4 large eggs
1 tbsp water
3 ½ cups sifted all purpose flour
½ tsp salt
Directions:
1. For the mix…add ½ cup water plus 1 tbsp water to the mix, place in the bowl of your stand mixer (or food processor)…seriously, I couldn’t even count to ten before it was done. It’s supposed to be very crumbly, so don’t worry and don’t overdo by adding more than a tbsp of water or mixing longer.
2. Using your hands, form the mix into several small balls…think Tennis. You’ll be feeding them through the flat pasta attachment and they will elongate so you want them to be a manageable size.
3. Using a rolling pin on a floured surface, flatten each ball to a little thicker than ¼” and not as wide as the attachment. (note: I'd go a little thinner than this next time)
4. Next comes the hard part, but only until you figure things out. So…having no extra hand to take photos, I hope I got the message across for first time pasta makers...Pros...share any pointers in the comments.
Set your speed to 2 on your KitchenAid Stand Mixer with your flat pasta attachment properly in place and the rollers set to 1.
Don't freak out like I did when much of the dough fell apart first time through. Just pick up the loose pieces and place it in the center of the flattened dough. Fold the dough in half over it and press. Then send through the roller again. This time it will be less crumbly.
Fold the dough in half (bottom to top) and repeat this step until the dough is smooth and soft - at least 10 times.
5.Next phase...once the dough looks like real dough...all the flour being incorporated and the texture is almost, but not quite sticky and looks shiny... feed it through the rollers (going from 2-7 or 8 depending on how thick/thin you like your pasta), changing the setting after each pass through. DO NOT FOLD the dough during this stage and change the setting after each passing.
6. Once the sheet has gone through to setting 7 or 8 ...it's done. 8 is really thin and I think I might leave it at 7 next time....experimentation is a good thing! Lightly flour and leave on a flat surface. This is where you'd stop for lasagna, cannelloni or ravioli.
For fettuccine (or whatever cool roller you have) change the roller head and feed each sheet through.
Lightly toss with flour to keep the strands from sticking to each other.
7. You can let the pasta dry for a bit before using. If you aren't using it right away, you can store the dry pasta in a ziplock baggie in the fridge for a few days.
Now you're ready for the cooking. The actual cooking of fresh pasta is just 1-3 minutes. So have your sauce ready.
Here are a few of my favorite sauces (the photos are with different pastas, but they would all work even better with homemade:
Of course...to really allow the pasta to be the star, simple sauces are best:
Bolognese I would make the pasta thicker for any meaty sauce.
So what are you waiting for! It's really simple once you get the knack and the rewarding dishes are worth the effort.
All you pasta making pros out there...please share your tips with the rest of us newbie pasta makers.


No comments:
Post a Comment