Showing posts with label bread. Show all posts

Monday, November 23, 2009

Whole Grain Rye Bread

Whole Grain Rye Bread
from Healthy Bread in Five Minutes a Day

Printable Recipe

Hands-on time: 5-10 minutes

Rest time: 2 hours on the counter in a lidded but not air tight container
The dough can be used immediately after the first rising or up to seven days refrigerated. According to the authors, the flavor will be better if you wait for at least 24 hours of refrigeration before baking.

Shaping and second rising: 90 minutes, if the dough has been refrigerated, or 40 minutes if fresh.

Baking time: 30-35 minutes

Makes 2 large loaves

Ingredients:
2 ½ cups whole wheat flour
2 ¾ cups rye flour
2 ½ cups unbleached all-purpose flour
1½ tablespoons granulated yeast, or 2 packets
1 tablespoon kosher salt (increase or decrease to taste)
1 ½ tbsp caraway seeds plus some for sprinkling on top crust
¼ cup vital wheat gluten
4 cups lukewarm water

Directions:
Mixing and storing the dough:
1. Whisk together the flours, yeast, salt, caraway and vital wheat gluten in a 5-quart bowl, or a lidded (not airtight) food container.

2. Add the water and mix without kneading, using a spoon, a 14-cup food processor (with dough attachment), or a heavy-duty stand mixer (with paddle). You might need to use wet hands to get the last bit of flour to incorporate if you're not using a machine. (Ruth’s note: it really takes no effort to use a spoon in the storage bowl, so no need for extra cleaning)

3. Cover (not airtight), and allow the dough to rest at room temperature until it rises and collapses (or flattens on top), approximately 2 hours.

4. The dough can be used immediately after the initial rise, though it is easier to handle when cold. Refrigerate in a lidded (not airtight) container and use over the next 7 days. The flavor will be better if you wait for at least 24 hours of refrigeration before baking.

Baking:
5. On baking day, dust the surface of the refrigerated dough with flour and cut off a 1-pound (grapefruit-size) piece. Dust the piece with more flour and quickly shape it into a ball by stretching the surface of the dough around to the bottom on all four sides, rotating the ball a quarter-turn as you go.

6. Elongate the ball into a narrow oval. Allow the loaf to rest, loosely covered with plastic wrap, on a pizza peel prepared with cornmeal or line with parchment paper for 90 minutes (40 minutes if using fresh unrefrigerated dough).

7. Thirty minutes before baking time, preheat the oven to 450°F/220°C, with a baking/pizza stone on a rack in the center of the oven. Place an empty metal broiler pan or cake tin on any other rack that won’t interfere with the rising bread.

8. Just before baking, use a pastry brush to brush the loaf's top crust with water, and then sprinkle with additional caraway seeds. Slash the loaf with ¼” deep parallel cuts, using a serrated bread knife.

9. Slide the loaf directly onto the hot stone, or place the silicone mat or parchment paper onto the preheated cookie sheet if you don’t have a pizza stone. Pour 1 cup of hot tap water into the broiler pan and quickly close the oven door. Bake for 30-35 minutes or until richly browned and firm. If you used parchment paper, a silicone mat or a cookie sheet under the loaf, carefully remove it two-thirds of the way through the baking and bake the loaf directly on the stone or oven rack for the last third. Smaller or larger loaves will require adjustments in resting and baking times.

10. Remove the bread from the oven and allow it to cool on a rack before slicing and eating.

Chocolate Espresso Whole Wheat Bread

Healthy Chocolate Espresso Whole Wheat Bread

from Healthy Bread in Five Minutes a Day

Printable Recipe

Hands-on time: 10 minutes

Rest time: minimum…2 hours on the counter in a lidded but not air tight container plus at least 2 hours and up to five days refrigerated or up to two weeks in an airtight container in the freezer.

Shaping and second rising: 1 hour 45 minutes

Baking time: 45-50 minutes

Makes 2 large loaves

Ingredients:
2 cups whole wheat flour
4 cups unbleached all-purpose flour
1 cup cocoa powder
1½ tablespoons granulated yeast, or 2 packets
1 tablespoon kosher salt (increase or decrease to taste)
¼ cup vital wheat gluten
1 cup lukewarm brewed espresso or strong coffee
1¼ cups lukewarm water
4 large eggs
½ cup neutral-flavored oil
¾ cup honey
6 ounces bittersweet chocolate, finely chopped
Egg wash (1 egg beaten with 1 tablespoon water) for brushing on top crust
Raw sugar for sprinkling on top

Directions:
Mixing and storing the dough:
1. Whisk together the flours, cocoa powder, yeast, salt, and vital wheat gluten in a 5-quart bowl, or a lidded (not airtight) food container.

2. Combine the liquid ingredients and the chopped chocolate and mix with the dry ingredients without kneading, using a spoon, a 14-cup food processor (with dough attachment), or a heavy-duty stand mixer (with paddle). You might need to use wet hands to get the last bit of flour to incorporate if you're not using a machine.

3. The dough will be loose, but it will firm up when chilled. Don't try to use it without chilling at least 2 hours.

4. Cover (not airtight), and allow the dough to rest at room temperature until it rises and collapses (or flattens on top), approximately 2 hours.

5. Refrigerate it in a lidded (not airtight) container and use over the next 5 days. Beyond that, the dough stores well in the freezer for up to 2 weeks in an airtight container. Freeze it in 2-pound portions. When using frozen dough, thaw it in the refrigerator for 24 hours before use, then allow the usual rest/rise time.

Baking:
6. On baking day, grease an 8½× 4½-inch nonstick loaf pan. Dust the surface of the refrigerated dough with flour and cut off a 2-pound (cantaloupe-size) piece. Dust the piece with more flour and quickly shape it into a ball by stretching the surface of the dough around to the bottom on all four sides, rotating the ball a quarter-turn as you go.

7. Elongate the ball into an oval and place it into the loaf pan; your goal is to fill the pan about three-quarters full. Cover loosely with plastic wrap and allow to rest and rise for 1 hour 45 minutes.

8. Thirty minutes before baking time, preheat the oven to 350°F/175°C, with a rack placed in the center of the oven. If you're not using a stone in the oven, a 5-minute preheat is adequate. Steam is not needed.

9. Just before baking, Use a pastry brush to brush the loaf's top crust with egg wash, and then sprinkle with the raw sugar.

10. Bake near the center of the oven for approximately 45 to 50 minutes, until firm.

11. Remove the bread from the pan and allow it to cool on a rack before slicing and eating.


I loved it slathered with cream cheese or nutella.

VARIATION: Cupcakes
1. On baking day, grease a muffin tin. Dust the surface of the refrigerated dough with flour and cut off a 1½-pound (small cantaloupe-size) piece. Dust the piece with more flour and quickly shape it into a smooth ball by stretching the surface of the dough around to the bottom on all four sides, rotating the ball a quarter-turn as you go.

2. To form the cupcakes, divide the ball into 12 roughly equal portions (each about the size of a golf ball). Shape each one into a smooth ball as you did above. Place the buns in the prepared muffin tins. Allow to rest, loosely covered with plastic wrap, for 40 minutes.

3. Thirty minutes before baking time, preheat the oven to 350°F, with a rack placed in the middle of the oven. If you're not using a stone in the oven, a 5-minute preheat is adequate.

4. Just before baking, use a pastry brush to paint the top crust with egg wash, and then sprinkle with the raw sugar. Bake for about 20 minutes, until the cupcakes are richly browned and firm.

5. Remove the cupcakes from the tin and allow to cool on a rack before eating.

Sunday, November 08, 2009

Seriously Montreal Style Bagels

Seriously Montreal-style Bagels
From The New best of BetterBaking.com

Printable Recipe
Total bagel making time: 90 minutes or so
Prep time:
10 minutes
Kneading time: 10-12 minutes
Rest time: 10 minutes
Shaping time: 5-10 minutes
Rest time: 15 minutes
Boiling time: 10 minutes
Baking time: 20-25 minutes

Makes: 12-14 bagels

Ingredients:
1½ cups warm water
2¼ tsp instant yeast
4 tbsp white sugar
1 ¼ tsp salt
1 tbsp honey
2 tbsp beaten egg
3 tbsp vegetable oil
1 tsp malt powder or firmly packed brown sugar (I used the malt powder)
6-7 cups bread flour

¼ cup honey
1½ cups sesame seeds or poppy seeds (or half of each) for sprinkling

Directions:

1. Line a large baking sheet with parchment paper (for resting raw bagels). Stack 2 large baking sheets together and line the top one with parchment paper (for baking) and set aside.

2. Hand whisk the warm water and yeast in the bowl of an electric mixer and let it stand for 2-3 minutes to dissolve the yeast. Stir in the white sugar, salt, honey, egg, oil, malt powder and 6 cups of flour. Mix to make a soft mass. Knead with the dough hook on the lowest speed of the mixer for 10-12 minutes, gradually adding more flour as required to form a very stiff, smooth dough. Cover the dough with plastic wrap and let it rise for 10 minutes.

Note: my daughter doesn’t have a stand mixer with a dough hook so we started with her food processor and dough blade. That worked okay for the first mixing, but was too much work for the kneading, which we had to do by hand. They still turned out amazing, just required more elbow grease. The only reason I mentioned this is so that even those who don’t have stand mixers can enjoy Montreal style bagels.

3. Turn the dough out onto a lightly floured surface and divide it into
12-14 portions. Roll each portion into a 10 inch rope. Make each rope into a ring and gently rock back and forth on the counter to seal the ends. Place the rings onto the single baking sheet and let them rest for 12-15 minutes or until slightly puffy.

Naked bagels resting

4. Preheat the oven to 450°F/220°C (Ruth’s note: my daughter and I placed a pizza stone on the bottom shelf to increase the heat and do the final 5 minutes of baking).

5. Fill a large soup pot or Dutch oven ¾ full with water. Add the ¼ cup of honey and bring to a boil. Lower the heat to a good simmer and add the bagels a few at a time (you really don’t want to crowd them). Boil for 1 ½ -2 minutes, turning them over at midpoint. Using a slotted skimmer, transfer the bagels to the single parchment lined baking sheet to drain.

6. Put the sesame (or poppy) seeds in a shallow but wide bowl (or platter with raised sides – or the seeds will end up all over the place). Dip each bagel in the bowl to coat all sides with the seeds and then transfer them to the parchment lined, double stacked baking sheets.

Dressed in sesame seeds and waiting for the oven

Dressed in poppy seeds (My Honey said I got carried away with the seeds, so many fell off when we ate them)

7. Place them in the oven and immediately lower the temperature to 425°F/218°C and bake for 15-20 minutes or until lightly browned. Turn the bagels over and bake for 3-5 minutes longer (this is when my daughter and I placed them on the pizza stone) or until they are well browned on both sides.

8. Transfer to a wire rack and let them cool for 15 minutes before serving….which was the hardest part in our house.

The results had us, especially the ex-Montrealers in the group, moaning with delight. Serious thumbs up for authenticity.

Tuesday, September 22, 2009

Holiday Raisin Challah

Artisan Round Challah with Raisins
Adapted from 200 Fast and Easy Artisan Breads

Printable Recipe

Hands-on time: 10 minutes
Rest time: minimum…2 hours on the counter or up to 3 days in a lidded but not air tight container in the fridge.
Shaping and second rising: 40 minutes
Baking time: 40 minutes (since I did it in a spring form pan to retain its round shape, it took at least 20 minutes longer)

Makes 2 large loaves

Ingredients:
6 ½ cups unbleached bread flour
2 tbsp instant or bread machine yeast
1 ½ tbsp salt
2 ¾ cups hot water (yes I know they say hot water kills the yeast, but this is to melt the honey so it actually ends up tepid)
1 cup liquid honey
¼ cup vegetable oil
2 large eggs, at room temperature, lightly beaten

More bread flour for dusting and shaping
½ - ¾ cup sultana raisins (optional)
Egg wash (1 egg beaten with 1 tbsp water)

Directions:
To mix & store the dough: I just used a 5 liter/5 quart bowl with a lid and a wooden spoon. No kneading required.

1. Spoon the flour into a measuring cup and level off before adding to the mixing bowl.

2. Add the yeast and salt to the flour and stir with a whisk.

3. In a large glass measuring cup (I like to use a 4 cup one so I can stir easily without spilling any), combine the hot water, honey and oil. Mix until the honey has all melted and then beat in the eggs.

4. Pour the liquid mixture into the flour using a wooden spoon and stir just until it’s all moistened. Beat 40 times with the spoon, scraping the bottom and sides until the dough forms a lumpy, sticky mass. (Trust me, this does not look like your usual bread mixture, but it’s not supposed to).

5. Cover with plastic wrap, or in my case, I just used the lid, and allow it to rest at room temperature in a draft free place until the dough rises about 2 inches from the top of the bowl and has a sponge-like appearance – about 2 hours. You can bake the bread from this state) or let it “rest” in the fridge for up to 3 days before baking.

Baking the bread:
Note: this very delicious, brioche like bread will not stand up to the usual shaping. The first time I made it (without reading the book’s intro), it ended up really looking more like a foccacia. This time I used a 8” spring form cake pan, which worked well, but required longer baking time.

To shape the loaves and prepare for second rising:
1. Dust the surface of the dough with bread flour, (even keeping it in the fridge, it will still be incredibly sticky) and divide in half. (makes one loaf)

2. I did find this step difficult, because the dough was so sticky….the book says to lightly dust your hands, rolling pin and your work area with flour and work as quickly as you can, not to over work the dough. I seemed to need a lot of flour to keep the bread from sticking to everything.

3. Roll the dough into a large rectangle, dusting with flour when necessary.

If you are adding raisins, sprinkle over the rectangle and roll jelly roll style into a long rope and then form a coil. Tuck in the loose end under the loaf and transfer to the lightly oiled spring form pan.

4. Allow the dough to rest and rise, for 40 minutes, and, although it will still not look very impressive, it will continue to rise in the oven.


Baking:
5. 30 minutes before baking time, place a baking stone (I use my pizza stone) in the center of the oven. Preheat the oven to 350°F/175°C. Place an empty tin broiler or cake pan on the lowest rack in the oven.

6. Just before baking, brush the challah with the egg wash.

7. Slide the pan(s) (I usually make two at the same time) onto the hot stone. Pour 1 cup of hot water into the empty pan under the bread and quickly close the door.

8. Bake for at least 45 minutes. The loaf should be dark golden brown and the best tip of the cookbook….get an instant read thermometer and insert in center of loaf. It will register 190°F/90°C when done. Using the spring form pan meant longer cooking, so I had to place a sheet of aluminum foil over the top of the bread for the last 10 minutes or so, to keep it from going from golden brown to black!

8. Allow the bread to cool on a wire rack for 5 minutes before trying to remove the spring form sides. Allow to become completely cool before slicing

Leftovers are great toasted with a slather of honey or a perfect French Toast (if using raisins, eliminate the thyme).


Friday, February 06, 2009

Scandinavian Light Rye

Scandinavian Light Rye Bread
Adapted from The Bread Lover's Bread Machine Cookbook

Don't let the name fool you...the "light" just means color. The bread is dense and rich and delicious.


Hands-on time: 5 minutes
Bread machine just for kneading the dough: 1½ hours
Second rising: 40-60 minutes
Baking time: 25-30 minutes (or until bread sounds hollow when you tap it with your knuckles)
Ingredients: It’s important that the ingredients are added to the machine in the following order:
1 1/8 cup water (room temperature)
1 ½ tbsp canola oil
1 7/8 cups bread flour
1 1/8 cup rye flour
2 tbsp brown sugar
1 tbsp plus 1 tsp gluten
1 ½ tbsp caraway seeds
1 ½ tsp salt
1 tbsp bread machine yeast ( or 2 ½ tsp SAF yeast)
Coarse corn meal to sprinkle on the baking sheet

Directions:
1. Place all the ingredients in a bread maker in the order given and set to “dough”.

2. Once the dough cycle is finished, remove dough from the bread machine, shape into a loaf (this dough is quite dry, so you don’t even need to dump it onto a floured surface before shaping). Then either:
a) place it on a pizza paddle, sprinkled with coarse corn meal, close to the edge of the paddle furthest from the handle, cover
b) place the shaped dough on a prepared baking sheet (parchment paper sprinkled with corn meal. Note: if you only have rimmed baking sheets, use the underside, so the prepared loaf can just slide onto the pizza stone. If you don’t have a pizza stone, you still want to have a heated baking sheet in the oven – see step 4).

3. Cover with a clean dish towel and let rise until double (about 40-60 minutes), preferably in a warm, dry place away from drafts. It’s cold and drafty in my kitchen (open plan great rooms are lovely usually, but not for finding warm places for dough to rise) so I preheat the oven to 200°F/90°C (lowest setting) and as soon as it’s at that temperature I turn the oven off, leave the door open for a minute or two, add the covered loaf , close the door and let it sit until it doubles.
REMOVE THE BREAD FROM THE OVEN after 20 minutes (the entire resting process could take place on a dry draft free surface).

4. Preheat the oven to 425°F/220°C. For really crispy crusts like breads from a bakery, place a baking stone (if you have one – I use a pizza stone) set in the middle of the oven. Allow the pizza stone to heat through – 20-30 minutes. If you don’t have a pizza stone, you only need to preheat the oven for 10-15 minutes. I would place an unrimmed baking sheet (or rimmed baking sheet upside down) in the oven. Score the top of the loaf with a serrated knife 3 times diagonally (that means just lightly cut into the top of the dough). Cuts should be no deeper than ¼” . Do this quickly and don’t worry that the loaf will still fall slightly, it will rise again in the oven.

5. To bake the bread, I just use a dough scraper to help ease the loaf onto the pizza stone in the oven without losing its shape. If you don’t have a pizza paddle, slide the loaf on the parchment directly onto the heated baking sheet in the oven. Bake for 25-30 minutes or until the bread sounds hollow when you knock it.

Last great tip…if you want the crust crunchy, place 1 cup of very hot water in a shallow pan in the oven somewhere not in the way of the bread rising and quickly shut the door. This step was counter intuitive for me – adding steam to make something crunchy…but it really works.

6. Once the bread is ready, remove it from the oven and allow it to cool on a rack for about 10 minutes before slicing- hard to be patient, it smells so good.

Thursday, January 01, 2009

Bread Machine Plus Pumpernickel Rye

Bread Machine Plus Pumpernickel Rye
Adapted from The Bread Lover's Bread Machine Cookbook

Hands-on time: 5 minutes
Bread machine time: 1 hour 20 minutes
Resting time: 1 hour
Baking time: 30 minutes
Cooling time: 15-20 minutes

Makes 1 loaf

Ingredients: Make sure you place the ingredients in the order given. This recipe is for a medium loaf which for my bread maker means 1½ lb (680g) loaf

Ingredients:
1 1/3 cups water
3 ½ tbsp molasses
2 tbsp butter, melted
1 ½ cups bread flour
1 cup medium or dark rye flour
½ cup whole wheat flour
¼ cup cornmeal (I used finely ground)
3 tbsp unsweetened Dutch process cocoa powder
2 tbsp brown sugar
1 ½ tbsp dry nonfat milk
1 ½ tbsp gluten
½ tsp instant espresso powder
2 tsp caraway seeds
1½ tsp salt
1 tbsp bread machine yeast

Directions:
1. Place all the ingredients IN ORDER into the bread machine. Select Dough setting and press start. (My machine takes 1 hour 20 minutes).

2. When the bread machine beeps, press STOP and unplug the machine.

3. Turn the dough onto a lightly floured working surface (I used cornmeal). Knead a few times and pat into a 12”x6” rectangle. Roll up from the long edge into a loaf about 14” long. Cover gently with a damp dish towel and let it rise at room temperature until doubled in bulk – about 1 hour.

4. Preheat the baking stone before baking -place a baking stone on the center rack of a cold oven and preheat to 450°F/230°C. Place an EMPTY cake pan or broiler tray out of the way of your stone (I put mine on the lowest shelf, off to one side). I leave the oven on for at least 30 minutes before lowering the heat to 400°F/200°C.

5. Sprinkle a little cornmeal directly on your pizza/baking stone. Using a dough scraper or steel spatula to help you, quickly slide the loaf onto the prepared stone. Don’t worry if it slightly deflates. Just before shutting the door add 1 cup hot tap water to the hot empty baking pan. This will steam the oven and make a very crispy crust. Bake for about 30 minutes until the surface is dark brown and sounds hollow when you tap the top.

6. Remove and let it cool on a rack.

Sunday, November 09, 2008

Bread Machine Challah (Egg Bread)

Bread Machine Challah (Egg Bread)
Adapted from The Bread Lover's Bread Machine Cookbook

Hands-on time: 5 minutes
Bread machine time: 3 hours

Makes 1 loaf

Ingredients: Make sure you place the ingredients in the order given. This recipe is for a medium loaf which for my bread maker means 1½ lb (680g) loaf
¾ cup water
2 large eggs
1 tbsp honey
3 tbsp vegetable oil (I used canola)
3 cups bread flour
1 tbsp gluten with vitamin C
1½ tsp salt
1¾ tsp SAF yeast or 2¼ tsp bread machine yeast (my choice)
1 tbsp poppy or sesame seeds for sprinkling

Directions:
1. Place all the ingredients IN ORDER into the bread machine. Set crust to medium and program Basic cycle setting and press start. (My machine takes 3 hours).

Note: The book says to add the poppy or sesame seeds during the third rising, close the lid and allow to finish rising and baking. Unfortunately, I was going out, so I missed this step.

The loaf came out huge but perfect for sandwiches or French toast.

Saturday, October 11, 2008

Fancy Round Challah with Raisins

Fancy Round Challah with Raisins
From Artisan Bread in 5 Minutes a Day

Hands-on time: 10 minutes
Rest time: minimum…2 hours on the counter or (and my favorite way) up to 5 days in a lidded but not air tight container in the fridge. (after that you can freeze in 1 lb/450g portions in air tight containers in the freezer for up to 4 weeks). If you are going to freeze the bread, you need to defrost in the fridge overnight
Shaping and second rising: 30 minutes
Baking time: 25-35 minutes (depending on the size of the loaf(ves)

Makes 4 (1lb/450g) loaves (I made two large loaves)

Ingredients:
1 ¾ cups lukewarm water
1 ½ tbsp granulated yeast (I used the one for the bread machine, because … that’s what I had)
1 ½ tbsp salt
4 large eggs, at room temperature, lightly beaten
½ cup honey
½ cup unsalted butter, melted (or canola oil) I tried it both ways and the one with butter tasted like brioche…both excellent variations.
7 cups unbleached all purpose flour (dough will be very sticky to work with. Just oil your hands)
½ - ¾ cup sultana raisins
Egg wash (1egg beaten with 1 tbsp water)

Directions:
To mix & store the dough: I used my KitchenAid with dough hook attachment but you can use a 14 cup capacity food processor or a 5 litre/5 quart bowl and a wooden spoon. No kneading required!

1. Mix the yeast, salt, eggs, honey and melted butter or oil with the water in the stand mixer or bowl. You can either add ¾ cup raisins at this point or wait until ready to make the bread. If you want to split the batch…some with raisin some without, then wait. If you are going to use the entire batch for fancy challahs, I’d mix them in at this point so the raisins can be more evenly distributed in the bread.

2. Mix in the flour without kneading, using a spoon, food processor or my favorite, the stand mixer. The food processor and mixer require the dough blade or dough hook.

3. Cover (not air tight) and allow it to rest at room temperature until the dough rises and collapses – about 2 hours (you can bake the bread from this state) or let it “rest” in the fridge for up to 5 days. After that, you can freeze the dough in 1 lb/450g portions in an air tight container for up to 4 weeks. Defrost the frozen dough overnight in the fridge before using. Allow the usual rest and rise time.

Baking the bread:
1. Prepare a large rimmed baking sheet: cover with parchment for easy cleanup or else lightly oil the pan.

2. Dust the surface of the refrigerated (or counter top) dough with flour and cut off a 1 lb piece (they say the size of a grapefruit, but if the recipe makes 4 loaves, just cut off a quarter of the dough. For dinner, I made 2 loaves out of the batch. Left overs make great toasted raisin bread.

3. Quickly (no more than a minute) shape the dough into a ball by stretching the surface of the dough around to the bottom, sprinkling with more flour, rotating the ball quarter turns as you go. My version of shaping the dough is slightly different than the book’s. When I tried their approach the shape warped, so I used my daughter’s version. The butter dough is firmer to work with but if you oil your hands, the oil dough is fine too.

If you are adding raisins at this stage rather than when you made the dough:
Using minimal dusting flour and a rolling pin, roll out the dough to ½” thickness. Sprinkle with raisins and roll into a long rope.

If you are using dough prepared with raisins just shape into a long rope and continue at this stage:

Cut the log in half across and form a coil on the center of the baking sheet. (I have a very large baking sheet that can hold 2 large loaves diagonally leaving enough room between the loaves for rising in the oven). Elongate the second half into a more slender, longer rope. Tuck one end under the already formed coil and continue to make 1-2 rings around the first. Tuck in the loose end under the loaf.

4. Allow the dough to rest and rise, for 1 hour 30 minutes (you only need 40 minutes if you are using fresh unrefrigerated dough). If you are using the oil based dough, it will look wider than tall at this point, but don't worry, it will continue to rise in the oven.

5. 30 minutes before baking time, place a baking stone (I use my pizza stone) in the center of the oven. Preheat the oven to 350°F/175°C. Don't worry if you don't have a stone, it will still work fine. Because this dough will not crisp like some of the French or rye breads, the oven doesn't need to heat as high to come out perfectly.

6. Just before baking, brush the challah with the egg wash.

7. Slide the baking sheet directly onto the hot stone. Bake for about 25-35 minutes. The loaf should be dark golden brown and the center resistant to pressure.

8. Allow it to cool before slicing.

Leftovers are great toasted with a slather of honey.

Monday, September 08, 2008

Homemade Deli Rye Bread

Homemade Deli Rye Bread
From Artisan Bread in 5 Minutes a Day

Hands-on time: 10 minutes
Rest time: minimum…2 hours on the counter or (and my favorite way) up to 14 days in a lidded but not air tight container in the fridge.
Shaping and second rising: 40 minutes
Baking time: 30 minutes

Makes 4 (1lb/450g) loaves

Ingredients:
3 cups lukewarm water
1 ½ tbsp granulated yeast (I used the one for the bread machine, because … that’s what I had)
1 ½ tbsp caraway seeds (plus more for sprinkling on top before baking)
1 ½ tbsp salt
1 cup rye flour
5 ½ cups all purpose flour
Cornmeal for the pizza peel
Cornstarch wash (see bottom of post)

Directions:
To mix & store the dough: I used my KitchenAid with dough hook attachment but you can use a 14 cup capacity food processor or a 5 litre/5 quart bowl and a wooden spoon. No kneading required!

1. Mix the yeast, caraway seeds and salt with the water in the (stand mixer) bowl.

2. Mix in the flour at once just until the batter is evenly mixed. No kneading required! It only takes a few minutes in the mixer, slightly longer by hand. Wet your hands to incorporate the last bit of flour and to transfer the dough to a large bowl that has a cover – not air tight, though.

3. Cover (not air tight) and allow it to rest at room temperature until the dough rises and collapses – about 2 hours (you can bake the bread from this state) or let it “rest” in the fridge for up to 14 days.

Baking the bread:
1. Dust the surface of the refrigerated (or counter top) dough with flour and cut off a 1 lb piece (they say the size of a grapefruit, but if the recipe makes 4 loaves…I say just cut off a quarter of the dough in the container), recover and place back in the fridge for next time.

2. Quickly (no more than a minute) shape the dough into a ball by stretching the surface of the dough around to the bottom, rotating the ball quarter turns as you go. Elongate the dough into an oval shape. Allow it to rise on a cornmeal covered pizza peel for 40 minutes.

Alternative for a caraway swirl rye:
After shaping the dough into a ball, use your hands and a rolling pin to flatten the ball into a ½” thick oval – avoid using extra flour or it might remain as the dry deposit in the caraway swirl.

Sprinkle the dough evenly with 2 tbsp caraway seeds. Roll up the dough from the short end like a jelly roll, forming a cylindrical loaf. Pinch ends closed. If you’re using this variation, allow the dough to rise for 1 hour 20 minutes before baking.


Alternative for Onion rye:
Caramelize 1 medium onion, halved and thinly sliced. Instead of sprinkling caraway seeds as for the swirl rye, spread the caramelized onion and continue to roll as above.

3. If I cover the pizza peel with parchment paper, I find the dough maintains its oval shape better. Otherwise mine sticks and some strange shapes hit the pizza peel. Still tastes great, but….

4. 30 minutes before baking time, place a baking stone (I use my pizza stone) in the center of the oven and an empty tin broil or cake pan on the lowest shelf.

For all versions of rye bread, preheat the oven to 450°F/220°C (hottest setting without broil). Bake at this temperature as well.

5. Just before baking, paint the top crust with cornstarch wash (see below) and then sprinkle with additional caraway seeds. Slash with deep parallel cuts across the top of the loaf, using a serrated bread knife.

6. Slide the loaf directly onto the hot stone. Pour 1 cup of hot water into the empty pan and quickly shut the oven door to keep the steam in. Bake for about 30 minutes. The loaf should be dark golden brown and firm.

7. Allow it to cool before slicing.

Cornstarch wash: Blend ½ tsp cornstarch in a small amount of water to form a paste. Add ½ cup of water and whisk with a fork. Microwave or boil until the mixture appears glassy (30-60 seconds on high in the microwave). It will keep in the fridge for 2 weeks.


Saturday, September 06, 2008

Marty's Cranberry Orange Loaf

Marty's Cranberry Orange Loaf
From Marty's World Famous Cookbook

Prep time: 10 minutes
Baking time: 60 minutes (or until a toothpick comes out dry and clean)

Makes: 1 loaf

Ingredients:
Loaf:
2 cups all purpose flour
2 tbsp orange zest (from one large orange)
1 ½ tsp baking powder
½ tsp baking soda
½ tsp kosher salt
1 ½ cups fresh cranberries (I used frozen)
½ cup pecan pieces
¼ cup unsalted butter, softened
1 cup granulated sugar
1 egg
½ cup freshly squeezed orange juice (about 1 large orange)
Glaze:
2/3 cup icing sugar
Zest and juice of 1 orange

Directions:
1. Preheat oven to 350°F/180°C and grease a 9”x5” loaf pan

2. In a bowl, whisk together the flour, orange zest, baking powder, baking soda, and salt. Stir in the cranberries and pecans. Set aside.

3. In a separate large bowl, cream together the butter, sugar and egg. Stir in the orange juice. Add the flour mixture and stir until just combined. Pour into the prepared loaf pan.

4. Bake for one hour or until the toothpick inserted in the center comes out clean.

For the glaze:
Combine the icing sugar, zest, and juice. (Ruth's note: It looks much thinner than most glazes I've tried, but don't be fooled...and don't mess around trying to thicken it up...it's perfect as is)
Brush over the loaf while it’s still warm in the pan and allow the glaze to soak in.

Cool in the pan for 1 hour, cut and serve.

Saturday, June 21, 2008

Pumpernickel Rye

Pumpernickel Rye Bread
Adapted from The Bread Lover's Bread Machine Cookbook

Hands-on time: 5 minutes
Bread machine just for kneading the dough: 1½ hours
Second rising: 60 minutes
Baking time: 30 minutes (or until bread sounds hollow when you tap it with your knuckles)

Ingredients: It’s important that the ingredients are added to the machine in the following order:
1 1/3 cup water (room temperature)
3 ½ tbsp molasses
2 tbsp butter, melted
1½ cups home-style white bread flour
1 cup rye flour
½ cup whole wheat flour
¼ cup fine ground cornmeal
3 tbsp unsweetened Dutch process cocoa powder
2 tbsp brown sugar
1½ tbsp gluten
½ tsp instant espresso powder
2 tsp caraway seeds
1½ tsp salt
2 ½ tsp bread machine yeast
Fine corn meal to sprinkle on the baking sheet

Directions:
1. Place all the ingredients in a bread maker in the order given and set to “dough”.

2. Once the dough cycle is finished, remove dough from the bread machine, shape into a loaf and place on a prepared baking sheet (parchment paper sprinkled with corn meal). Cover and let rise until double (about an hour or so). If it’s cold and drafty in my kitchen (open plan great rooms are lovely usually, but not for finding warm places for dough to rise), I preheat the oven to 200°F/90°C (lowest setting) and as soon as it’s at that temperature I turn the oven off, leave the door open for a minute or two, add the covered loaf, close the door and let it sit until it doubles. Norene’s Gilletz' great tip…it’s ready if you stick your finger deeply into the loaf and it doesn’t bounce right back.

3. REMOVE THE BREAD FROM THE OVEN after 20 minutes (the entire resting process could take place on a dry draft free surface).
4. Preheat the oven to 425°F/220°C. Place a baking stone (if you have one – I use a pizza stone set in the middle of the oven. Allow the oven to heat for 20 minutes longer.

5. To bake the bread, I do not remove the loaf from the parchment lined baking sheet. I just place the entire sheet on top of the baking stone and bake for 30 minutes or until the bread sounds hollow when you knock it.

Last great tip…if you want the crust crunchy, place 1 cup of water in a shallow pan in the oven somewhere not in the way of the bread rising.

6. Once the bread is ready, remove it from the oven and allow it to cool on a rack for about 10 minutes before removing from the pan.


Friday, June 20, 2008

Gingery Carrot Loaf

Gingery Carrot Loaf
From WomenHeart's All Heart Family Cookbook

Hands-on time: 5 minutes
Baking time: 1 hour (or until the toothpick comes out clean)

Makes 1 loaf

Ingredients:
1¾ cups whole wheat pastry flour (I just pulsed my regular whole wheat flour in the food processor a few times)
½ cup pecans, toasted and chopped
2 tbsp crystallized ginger, coarsely chopped
1 tsp baking soda
½ tsp baking powder
¼ tsp salt
1 cup grated carrots
2/3 cup brown sugar, firmly packed
½ cup vanilla soy milk (probably the only time I’ll use soy milk is in baking)
3 tbsp light olive oil
1 large egg

Directions:
1. Pre heat the oven to 350°F/170°C and coat a 8”x4” loaf pan with cooking spray.

2. In a large bowl, whisk together the flour, pecans, ginger, baking soda, baking powder and salt.

3. In a small bowl combine carrots, sugar, milk, oil and egg. Make a well in the center of the flour mixture and add the carrot mixture to it, stirring just until blended.

4. Pour in to the prepared loaf pan and bake in the center of the oven for 60 minutes. Test for doneness by sticking a wooden toothpick in the center. If it comes out dry, it’s done.

5. Cool in the pan on a cake rack for 5 minutes. Remove from the pan and continue to cool completely.

Monday, May 26, 2008

Dakota Bread

Dakota Bread
Adapted from The Bread Lover's Bread Machine Cookbook

Hands-on time: 5 minutes
Bread machine time: 1 hour 20 minutes
Rising time: 1 hour
Baking time: 30 minutes
Cooling time: 15-20 minutes

Makes 1 loaf

Ingredients: Make sure you place the ingredients in the order given. This recipe is for a medium loaf which for my bread maker means 1½ lb (680g) loaf

1¼ cups water
2tbsp canola oil
2 tbsp honey
2 ¼ cups bread flour
½ cup whole wheat flour
¼ cup raw bulgar wheat ( used wheat germ instead)
2 tsp gluten
1½ tsp salt
¼ cup sunflower seeds
¼ cup pumpkin seeds, chopped
2 tsp sesame seeds
1 ½ tsp poppy seeds
2 ½ tsp bread machine yeast

Directions:
1. Place all the ingredients IN ORDER into the bread machine. Select Dough setting and press start. (My machine takes 1 hour 20 minutes).

2. When the bread machine beeps, press STOP and unplug the machine.

3. Turn the dough onto a lightly floured working surface (I used whole wheat flour). Knead a few times and pat into a 12”x6” rectangle. Roll up from the long edge into a loaf about 14” long. Cover gently with a damp dish towel and let it rise at room temperature until doubled in bulk – about 1 hour.

4. Preheat the baking stone before baking -place a baking stone on the center rack of a cold oven and preheat to 450°F/230°C. Place an EMPTY cake pan or broiler tray out of the way of your stone (I put mine on the lowest shelf, off to one side). I leave the oven on for at least 30 minutes before lowering the heat to 400°F/200°C.

5. Sprinkle a little flour directly on your pizza/baking stone. Using a dough scraper or steel spatula to help you, quickly slide the loaf onto the prepared stone. Don’t worry if it slightly deflates. Just before shutting the door add 1 cup hot tap water to the hot empty baking pan. This will steam the oven and make a very crispy crust. Bake for about 30 minutes until the surface is dark brown and sounds hollow when you tap the top.

6. Remove and let it cool on a rack.

Tuesday, May 13, 2008

French Whole Wheat Bread - Healthy Baguettes

French Whole Wheat Bread
Adapted from The Bread Lover's Bread Machine Cookbook

Hands-on time: 5 minutes
Bread machine time: 1 hour 20 minutes
Rising time (in the bread machine) 30 minutes
Baking time: 30-35 minutes
Cooling time: 15-20 minutes

Makes 1 loaf

Ingredients: Make sure you place the ingredients in the order given. This recipe is for a medium loaf which for my bread maker means 1½ lb (680g) loaf

1¼ cups plus 1 tbsp buttermilk (or 1 ¼ cups milk plus 1 tbsp lemon juice)
2½ cups whole wheat flour
½ cup whole grain spelt flour or ½ cup more whole wheat flour (my choice)
1 tbsp gluten with vitamin C
1½ tsp salt
1 tbsp plus 1 tsp SAF yeast or 1 tbsp plus 2 tsp bread machine yeast (my choice)

Directions:
1. Place all the ingredients IN ORDER into the bread machine. Select Dough setting and press start. (My machine takes 1 hour 20 minutes). This dough is very sticky so when it’s ready to come out of the bread machine, just quickly tip it onto a prepared pan.

2. When the bread machine beeps at the end of the dough cycle, press STOP and unplug the machine. Open the lid and use your fingers (I oiled mine a little) to deflate the dough. Let the dough rise in the machine for another 30 minutes (kitchen timer is useful here).

3.Turn the dough onto a lightly floured working surface (I used whole wheat flour). Knead a few times and pat into a 12”x6” rectangle. Roll up from the long edge into a flat loaf and roll back and forth with your palms to make pointed eggs. Fold the log of dough in half lengthwise and pinch seams to seal. Roll the dough back and forth again (my loaf seemed to twist, but I liked the effect) to make the loaf about 14” long. Cover gently with a damp dish towel and let it rise at room temperature until doubled in bulk – about 1 hour.

4. Twenty minutes before baking, place a baking stone on the center rack of a cold oven and preheat to 450°F/230°C. Place an EMPTY cake pan or broiler tray out of the way of your stone (I put mine on the lowest shelf, off to one side). Even though my oven preheats quickly, I leave the oven on for 20 minutes before lowering the heat to 400°F/200°C.

5. Holding kitchen shears at 45 degree angle, snip the surface 5 or 6 times down the length of the loaf, cutting no more than 1” deep.

6. Sprinkle a little flour directly on your pizza/baking stone. Using a dough scraper or steel spatula to help you, slide the loaf onto the prepared stone. Just before shutting the door add 1 cup hot tap water to the hot empty baking pan. This will steam the oven and make a very crispy crust. Bake for 30-35 minutes until the surface is dark brown and sounds hollow when you tap the top.

7. Remove and let it cool on a rack.

Best served right out of the oven, but almost as good toasted the next day for breakfast or cut in cubes and made into croutons.

Wednesday, April 02, 2008

100% Whole Wheat Sandwich Bread

100% Whole Wheat Sandwich Bread
From Artisan Bread in 5 Minutes a Day

Hands-on time: 5 minutes
Rest time: minimum…2 hours on the counter or (and my favorite way) up to 5 days in a lidded but not air tight container in the fridge.
Shaping and second rising: 1 hour 40 minutes
Baking time: 50-60 minutes

Makes 3 (1½ lb/680g) loaves

Ingredients:
1½ cups lukewarm water
1½ cups lukewarm milk
1½ tbsp granulated yeast (1½ packets)
1 tbsp plus 1 tsp salt
½ cup honey
5 tbsp neutral-flavored oil (I used canola) plus more for greasing the pan
6 2/3 cup whole wheat flour (avoid whole wheat pastry flour or “graham” flour)

Directions:
To mix & store the dough: I used my KitchenAid with dough hook attachment but you can use a 14 cup capacity food processor or a 5 litre/5 quart bowl and a wooden spoon. No kneading required!

1. Mix the yeast, salt, honey and oil with the milk and water in the (stand mixer) bowl.

2. Mix the flour using a spoon or dough hook attachment in a food processor or stand mixer.

3. Cover (not air tight) and allow it to rest at room temperature until the dough rises and collapses – about 2 hours (you can bake the bread from this state) or let it “rest” in the fridge for up to 5 days.

Baking the bread:
1. Lightly grease a 9”x4”x3” non-stick loaf pan. Using wet hands, scoop out a 1 ½ pound (cantaloupe size) handful of dough. Keeping your hands wet, quickly shape it into a ball by stretching the surface of the dough around to the bottom on all four sides.

2. Drop the loaf into the prepared pan. You want to fill the pan slightly more than half-full.

3. Allow the dough to rest for 1 hour and 40 minutes. Flour the top of the loaf and slash using the tip of a serrated bread knife.

4. 30 minutes before baking time, place a baking stone (I use my pizza stone) in the center of the oven and an empty tin broil or cake pan on the lowest shelf. Preheat the oven to 350°F/175°C .

5. Place the loaf on a rack near the center of the oven.

6. Pour 1 cup of hot water into the empty pan and quickly shut the oven door to keep the steam in. Bake for about 50-60 minutes. The loaf should be dark golden brown and firm.

7. Allow it to cool before slicing


Thursday, March 27, 2008

Pain D'Epi

Pain D’Epi or Wheat Stalk Bread
From Artisan Bread in 5 Minutes a Day

Hands-on time: 10 minutes
Rest time: minimum…2 hours on the counter or (and my favorite way) up to 14 days in a lidded but not air tight container in the fridge.
Shaping and second rising: 30 minutes
Baking time: 25 minutes

Makes 4 (1lb/450g) loaves

Ingredients:
3 cups lukewarm water
1 ½ tbsp granulated yeast (I used the one for the bread machine, because … that’s what I had)
1 ½ tbsp salt
6 ½ cups bread flour (I think I needed more because the dough was very wet)
Whole wheat flour for the pizza peel and sprinkling on top of the loaf

Directions:
To mix & store the dough: I used my KitchenAid with dough hook attachment but you can use a 14 cup capacity food processor or a 5 litre/5 quart bowl and a wooden spoon. No kneading required!

1. Mix the yeast and salt with the water in the (stand mixer) bowl.

2. Mix in the flour at once just until the batter is evenly mixed. Do not knead! It only takes a few minutes in the mixer, slightly longer by hand. The dough should be wet and loose enough to conform to the 5 liter (5 quart) container with a lid but not air tight. I think my dough was a little too wet, so I’ll add a bit more next time around.

3. Cover (not air tight) and allow it to rest at room temperature until the dough rises and collapses – about 2 hours (you can bake the bread from this state) or let it “rest” in the fridge for up to 14 days.

Baking the bread:
1. Dust the surface of the refrigerated (or counter top) dough with flour and cut off a 1 lb piece (they say the size of a grapefruit, but if the recipe makes 4 loaves…I say just cut off a quarter of the dough in the container), recover and place back in the fridge for next time.

2. Quickly (no more than a minute) shape the dough into a ball by stretching the surface of the dough around to the bottom. I had to keep sprinkling with more flour (I used whole wheat), rotating the ball quarter turns as you go. Fold the dough into three, lengthwise like a letter, pinching the seams closed as you fold. Stretch the dough gently into the shape of a baguette. If it shrinks back, let it rest for a minute and continue to work until you have a long, thin baguette .

3. Allow the dough to rest and rise, on a whole wheat flour dusted pizza peel, covered for 30 minutes. Do not slash yet.

4. 30 minutes before baking time, place a baking stone (I use my pizza stone) in the center of the oven and an empty tin broil or cake pan on the lowest shelf. Preheat the oven to 450°F/220°C (hottest setting without broil).

5. Just before baking, dust the loaf with flour. With a sharp pair of scissors snip the loaf from the top down at a 45° angle into the dough, stopping ¼” from the bottom. Fold each cut piece over to the side, alternating with each cut.

6. Slide the loaf directly onto the hot stone. Pour 1 cup of hot water into the empty pan and quickly shut the oven door to keep the steam in. Bake for about 25 minutes. The loaf should be dark golden brown and firm.

7. Allow it to cool before breaking off a section and, even if yours doesn’t look as awesome as those in French bakeries, I promise the flavor will be as delicious as any you’ve tried! Crispy crust and chewy center...perfect!

For the perfect tutorial go to ArtisanBreadinFive...after all Zoe Francois & Jeff Hertzberg are the experts.


Saturday, March 15, 2008

Wine & Rosemary Focaccia

Wine Rosemary Focaccia
Adapted from The Bread Lover's Bread Machine Cookbook

Hands-on time: 5 minutes
Bread machine time: 1 hour 20 minutes
Baking time: 25-30 minutes
Cooling time: 10 minutes

Makes 1 loaf

Ingredients: Make sure you place the ingredients in the order given. This recipe is for a medium loaf which for my bread maker means 1½ lb (680g) loaf

1 1/8 cup slightly warm water
½ cup dry white wine (room temperature)
3 tbsp extra virgin olive oil
4 cups bread flour
2 tsp salt
2 ½ tsp bread machine yeast

Topping:
¼ cup extra virgin olive oil
3 tbsp fresh rosemary, chopped

Directions:
1. Place all the ingredients except the topping – IN ORDER into the bread machine. Select Dough setting and press start. (My machine takes 1 hour 20 minutes). This dough is very sticky so when it’s ready to come out of the bread machine, just quickly tip it onto a prepared pan.

2. While the bread machine is doing its thing, line a 15”x10” lipped baking sheet or jelly roll with lightly oiled parchment paper. (I hate cleaning up.)

3. After turning the dough onto the parchment paper, use the heel of your hand to flatten and quickly spread the dough to fit the pan. Cover gently with oiled plastic wrap and let it rise at room temperature until doubled in bulk – about 45 minutes.

4. To prepare the topping, add the chopped rosemary to the olive oil and let it “steep” for 20 minutes at room temperature.

5. Twenty minutes before baking, place a baking stone on the lowest rack of a cold oven and preheat to 450°F/230°C. Even though my oven preheats quickly, I leave the oven on for 20 minutes before lowering the heat to 400°F/200°C.

6. Using your fingertips or knuckles, gently dimple the dough all over the surface. Drizzle with olive oil & rosemary, letting it pool in the dimples. Place the pan over the baking stone and bake for 25-30 minutes or until golden brown.

7. Remove from the oven and let it cool for 15 minutes in the pan. Serve warm.

Saturday, March 08, 2008

Swedish Rye Bread - Started in a Bread Machine


Swedish Rye Bread
Adapted from The Bread Lover's Bread Machine Cookbook

Hands-on time: 5 minutes
Bread machine just for kneading the dough: 1½ hours
Second rising: 40 minutes
Baking time: 30 minutes (or until bread sounds hollow when you tap it with your knuckles)

Ingredients: It’s important that the ingredients are added to the machine in the following order:
1 ¼ cup water (room temperature)
2 tbsp canola oil
3 tbsp honey
2 cups home-style white bread flour
1 ¼ cup rye flour
1 tbsp plus 1 tsp gluten
2 tsp fennel seeds
1½ tsp orange zest
1¼ tsp salt
2 ½ tsp bread machine yeast
Fine corn meal to sprinkle on the baking sheet

Directions:
1. Place all the ingredients in a bread maker in the order given and set to the “dough” cycle.

2. Once the dough cycle is finished, remove dough from the bread machine, shape into a loaf and place on a prepared baking sheet (parchment paper sprinkled with corn meal). Cover and let rise until double (about 40 minutes or so). It’s cold and drafty in my kitchen (open plan great rooms are lovely usually, but not for finding warm places for dough to rise) so I preheat the oven to 200°F/90°C (lowest setting) and as soon as it’s at that temperature I turn the oven off, leave the door open for a minute or two, add the covered loaf , close the door and let it sit until it doubles.

3. REMOVE THE BREAD FROM THE OVEN after 20 minutes (the entire resting process could take place on a dry draft free surface).
4. Preheat the oven to 425°F/220°C. Place a baking stone (if you have one – I use a pizza stone) on a rack in the middle of the oven. Allow the oven to heat for 20 minutes longer. Score the top of the loaf with a serrated knife 3 times diagonally. Cuts should be no deeper than ¼” . Do this quickly and the loaf will still fall slightly.

5. To bake the bread, I do not remove the loaf from the parchment lined baking sheet (the first time I tried to do that...I ended up with focaccia!). I just place the baking sheet on top of the baking stone and bake for 30 minutes or until the bread sounds hollow when you knock it.

Last great tip…if you want the crust crunchy, place 1 cup of water in a shallow pan in the oven somewhere not in the way of the bread rising.

6. Once the bread is ready, remove it from the oven and allow it to cool on a rack for about 10 minutes before removing from the pan.


Monday, March 03, 2008

Whole Wheat Rosemary Focaccia

Whole Wheat Rosemary Focaccia
Adapted from The Bread Lover's Bread Machine Cookbook

Hands-on time: 5 minutes
Bread machine time: 1 hour 20 minutes
Resting time:1 hour
Baking time: 20-25 minutes
Cooling time: 15-20 minutes

Makes 1 loaf

Ingredients: Make sure you place the ingredients in the order given. This recipe is for a medium loaf which for my bread maker means 1½ lb (680g) loaf

2/3 cup warm water
1 cup warm milk
3 tbsp extra virgin olive oil
3 cups all purpose flour
1 cup whole wheat flour
2¼ tsp bread machine yeast

Topping:
3-4 tbsp extra virgin olive oil for drizzling
1-2 tbsp fresh rosemary, chopped
1-2 tbsp good coarse sea salt ( I used Maldon) for sprinkling

Directions:
1. Place all the ingredients except the topping – IN ORDER into the bread machine. Select Dough setting and press start. (My machine takes 1 hour 20 minutes). This dough is very sticky so when it’s ready to come out of the bread machine, just quickly tip it onto a prepared pan. Don't try to handle it too much, it will just coat your fingers like glue...that's how sticky it is.

2. While the bread machine is doing its thing, line a 15”x10” lipped baking sheet or jelly roll with lightly oiled parchment paper.

3.After turning the dough onto the parchment paper, use the heel of your hand to flatten and quickly spread the dough to fit the pan. Cover gently with oiled plastic wrap and let it rise at room temperature until doubled in bulk – about 1 hour.

4. Twenty minutes before baking, place a baking stone on the center rack of a cold oven and preheat to 450°F/230°C. Even though my oven preheats quickly, I leave the oven on for 20 minutes before lowering the heat to 425°F/220°C.

5. Using your fingertips or knuckles, gently dimple the dough all over the surface. Drizzle with olive oil, letting it pool in the dimples. Place the pan over the baking stone and bake for 15 minutes and sprinkle half the rosemary. Continue to bake for another 10-15 minutes or until golden brown.

6. Remove from the oven and sprinkle with the remaining rosemary and sea salt and let it cool for 10 minutes in the pan before sliding the focaccia onto a rack to continue cooling.

Wednesday, February 27, 2008

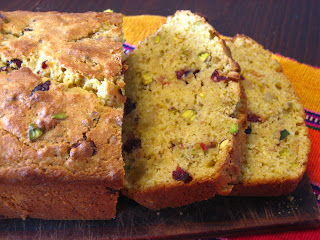
Cranberry, Pistachio & Ginger Loaf

Cranberry Pistachio & Ginger Loaf
Adapted from Jumbo Empanadas

Prep time: 10 minutes
Baking time: 1 hour 10 minutes
Makes 1 loaf

Ingredients:
Nonstick vegetable oil spray
1 cup unbleached all purpose flour
1 cup white whole wheat flour or regular whole wheat flour
1 cup medium-grind whole grain cornmeal or regular cornmeal
1/2 cup sugar
1 1/2 teaspoons salt
1 1/2 teaspoons baking powder
1 1/4 cups buttermilk
1/2 cup (1 stick) unsalted butter, melted
1/2 cup pure maple syrup
2 large eggs
1 teaspoon vanilla extract
3/4 cup pistachios, shelled and chopped
3/4 cup dried cranberries (about 4 ounces)
1/3 – ½ cup crystallized ginger, coarsely chopped

Directions:
1. Position rack in center of oven and preheat to 350°F/180°C. Spray 9x5x3-inch metal loaf pan with nonstick spray.

2. Whisk both flours, cornmeal, sugar, salt, and baking powder in large bowl. Whisk buttermilk, melted butter, maple syrup, eggs, and extract in medium bowl. Add buttermilk mixture to flour mixture; stir just until blended. Stir in 3/4 cup chopped pecans, ginger and cranberries.

3. Spoon batter into pan. Arrange pecan halves in row down center of batter. I didn’t have any handy.

4. Bake bread until top is golden brown and a toothpick inserted into center of bread comes out clean, tenting bread loosely with foil if browning too quickly, about 1 hour 10 minutes

5. Allow it to cool for 5 minutes in the pan and then remove and let the loaf rest on a rack until cooled.